Saturday, April 30, 2016

Finacle Training lesson 6 [ 2 Steps, 4 States]


finacle training lesson 6 by poupdates

Recap:

In the previous lesson we have learnt about the basic terminology which is used in Finacle. If you have not already read the previous lesson please read it and come back to start reading this lesson.

In this lesson we will learn about the basics of all the transnational procedures. This lesson is very important in this training series. So please pay a bit more attention.

There are two steps in the completion of transaction in Finacle.


Yes there are two steps in the completion of a single transaction in Finacle. In the first step Counter PA does the transaction in his/her login. In the second step Supervisor verifies/authorizes the transaction in their login. This concept of one person doing the transaction and other person verifying is called as maker-checker concept.

Why verification is necessary?

The answer is simple. Verification is necessary to prevent frauds, to check for errors and to prevent any misappropriations.
This verification concept is not new for us. We use to clear forms in the supervisor login of Sanchay post also. But verification had no significance in Sanchay post. Only because we cannot generate LOT without clearing the forms, we used to clear those forms.
But in finacle verification is mandatory. A transaction is completed only after the verification. Without verification of transactions we cannot perform day end operation.
So remember there are two steps in completion of any transaction. The transaction can be cash transaction or non cash transaction; it has to be verified by the supervisor.
Note: There is only one transaction which does not require any verification. It is SB withdrawal up to Rs.5000/-


The Four states of a Transaction


In the above section we have learnt that a transaction is not completed until verification is completed. So before verification a transaction will be in unverified state. In this unverified state there are 2 stages/states.

They are
1.     Entered State
2.     Posted State

After counter PA does a transaction in Finacle, it can be in either Entered state or in Posted State. After verification, the transaction changes its state to Verified State.

So totally there are 3 states for a transaction.
1.     Entered State
2.     Posted State
3.     Verified State

Now let us see what is meant by Entered state, posted state and verified State.

1.     Entered State: If a transaction is in entered state, it means that the deposit or withdrawal relating to that transaction has not yet been affected in the ledger of the account.
It means that, the transaction takes place but it will not affect any of the ledgers, be it the account ledger, teller cash position or LOT. Only after verification all these will be affected and the transaction will change its state to Verified State.
The transaction which will be in entered state before verification are a) RD deposit, b) SB withdrawal above 5000 and c) New accounts in which transaction is required.
We cannot modify any transaction once it is done.
We can delete transactions which are entered state. So if you do any mistake in transactions which are in entered state, we can delete that transaction and do that transaction again correctly.
Deleting does not mean that the transaction completely vanishes from the system. It will be available in the system as a deleted transaction.

2.     Posted State: If a transaction is in posted state, it means that the deposit or withdrawal relating to that transaction has affected the ledger of the account.
It means that, the transaction has affected the account ledger, teller cash position and it will also appear in the LOT.
The transactions which will be in posted state before verification are a) All transactions which are not in entered state b) all transactions which are not in verified state and c) transaction whose state is modified from entered state using HTM menu before verification.
We cannot modify or delete a transaction which is in posted state.

3.     Verified State: A transaction is said to be verified only after verification is done by supervisor. But there is one exception. SB withdrawal up to Rs.5000/- does not require verification. It will be in verified state by default.
We cannot modify or delete a transaction which is in verified state.
4.     All transactions which are deleted will be in deleted state. Only the state changes from entered to deleted state. The transaction will still be available in the system for inquiry.
So these are the four states of transaction. I hope you are following me.

Since this is not a live training session. I will give you some work which you have to do in office. From this lesson onwards you will have some observations to do in the office. If you do these observations or work which I give you at the end of each lesson from now onwards, you will understand more clearly what I’m trying to teach.


Observation to be done at office:
1.     Collect some SB, RD, PPF and SSA transactions which you have done in the day.
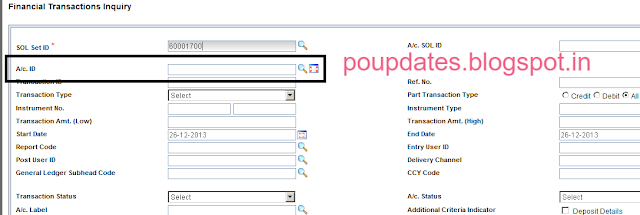
2.     Invoke the menu HFTI (Don’t worry I’ll teach about HFTI menu in detail in later lessons).
3.     A new screen will appear. In that screen you will see field  “A/c  Id” ( See the image below)


finacle training lesson 6 by poupdates


In the A/c Id field enter the account numbers which you have collected in the first step, one by one. For example, enter SB account number of the transaction and Click on Go button.
4.     When you enter the account number and click on GO, the following screen will come.


finacle training lesson 6 by poupdates

5.     Repeat the same process with the vouchers of all transactions.
What you have to do is observe the status of each transaction before verification and after verification.
So that’s it for today’s lesson. See you again tomorrow.
Points to remember in this lesson:
1.     There are two steps in completion of a transaction. Counter PA does the transaction and supervisor verifies the transaction
2.     There are three states for a transaction. They are Entered State, Posted State and Verified state.

Finacle Training Lesson 5 [ Nomenclature , User Interface]


finacle training lesson 5 by poupdates
FINACLE TRAINING LESSON 5

Recap:

In the previous lesson we were learning about the basic terminology used in Finacle. As a part of it we have learnt about what is Function. If you have not read the previous lesson, please read it first and then come back and continue reading this lesson.
In today’s lesson we will learn more about the terminology used in Finacle.

 Finacle Terminology continued…


In the previous lesson we have learnt that, we instruct Finacle what to do, by choosing appropriate function. But Function alone is not enough to complete a transaction. Sometimes Finacle needs some additional information to fully understand what you want to do. Let’s see this with an example.

Suppose a customer has come to your counter to make an RD Deposit by cash. Since RD Deposit can be made either by cash, or by post office SB cheque or by any bank Cheque, we need to tell finacle the mode of payment. We can tell the mode of payment by choosing appropriate option in Transaction Type. See the image below.


finacle training lesson 5 by poupdates

As we can see in the above image we chose Function as ADD since we are doing new cash transaction. But since RD deposit can be made by cash, POSB Cheque or bank cheque, we have to tell Finacle whether we are making the deposit by cash POSB/Bank cheque. We can tell this to Finacle by choosing appropriate option in Transaction Type.

·        For RD Deposit by cash we choose C/NR – Cash Deposit
·        For RD Deposit by POSB/Bank Cheque we choose T/CI – Transfer Customer Induced
·        T/BI Bank Induced option is used only in extra ordinary cases. (Bank doesn’t mean other bank. Bank means us. Bank means Post office. We are bank.)

In this way we give additional information about a transaction to Finacle. You will observe the following additional options in various menus
·        Function Type in CTM
·        Transaction Type/Subtype in HTM, CPDTM
·        Type in CPDTM
·        Scheme Code/ Scheme in all account opening menus
·        Product Group in MIS/TD opening and NSC/KVP issue menus.
All these additional options are used to give additional information about a transaction to Finacle.

Various Schemes available in Finacle


As per our POSB Rules we have several schemes which are SB, RD, MIS, TD, SCSS, SSA, NSC, KVP, NSS 87, NSS 92 etc. In Finacle we call these as Products.

In each product there are different types of schemes. Let’s see with an example.
Previously we used to call SB as scheme. But in Finacle
·        We call saving account with cheque book as a scheme.
·        We call saving account without cheque book as a scheme.
·        We call Pension account with cheque book as a scheme.
·        We call pension account without cheque book as a scheme.

Similarly In TD
·        We call 1 yr TD as a scheme
·        We call 2 yr TD as a scheme
·        We call 3 yr TD as a scheme
·        We call 5 yr TD as a scheme

Hope you are getting my point.

SB, RD, TD, MIS etc are called as Products. Whereas, schemes have an entirely different meaning in Finacle.

Different terms used in Finacle 

Please see the below table and you will understand the difference of terminology used in basic terms. For example we call a customer as DEPOSITOR, in finacle we call customer as Related Party. See the below table for more such differences and learn the terms used in Finacle for the old terms which we were using till now.

Terms used till now
Terms used in Finacle
Account number
Account ID
Depositor
Related Party
Schemes ( SB, RD, PPF etc)
Products
Customer
Retail Customer
Passbook View
Ledger Inquiry
A/c Conversion
A/c Modification
Ac transfer from one PO to Other PO
SOL transfer
Post Office
Service Outlet (SOL)


Finacle User Interface


It is essential but not compulsory to learn about the user interface of Finacle. People who are rigorous internet users can skip this part of the lesson. For those people who feel Internet as Chinese or Japanese language compulsorily read the following part. It will be helpful not only in Finacle but also when we start using CSI in our offices. Not only in office, even in your day to day life this knowledge of internet will be useful.

See the image below first then I’ll tell you in detail about what you see in the image.

finacle training lesson 5 by poupdates


The above image is a screen shot of our India Post Website. It’s nice and colorful. There are various items on the screen, our logo, menu, our national emblem, tracking section of mails, important news etc. All these things are called as Elements.

These elements are all put together to form a Website. We know that Finacle is also a website. Since Finacle is also a website it will also have these elements. I will discuss all the elements which are used in Finacle. Now again see the below image.

finacle training lesson 5 by poupdates


Not so colorful. But the elements are same. Let us discuss each element in detail.

Text Field: A text field is an element in which you can enter some data.  As shown in the above all the rectangle boxes are text fields. See in Address Line 1 and Address Line 3 I have noted them as Text Fields. I’m so lazy yar. That’s why I noted only two boxes as text fields. But all the other rectangular boxes are also called as Text Fields only. We can simply call Text field as Field.

Labels: In the above image Address Line 1 is the Label of the Text Field which I have noted in the image. Similarly Phone Type is the Label of the Drop down Box. Label is nothing but the name of the other elements.  For example If I tell you Pin as 500018 then you have to click on the text field beside Pin Label on the screen and then you have to enter the pin as 500018.

You may be thinking why all this nonsense you are teaching man, go straight into finacle. Let me explain. One of our respected staff who came for finacle training at my training center did this. I told him to enter address in Address field 1. He was clicking on the Label instead of clicking in the rectangular box beside it. I was shocked. People have very little knowledge about internet and computers. That’s why I’m forced to cover all this basic stuff. Moreover I'll be using these terms very frequently in the coming lessons. So lets get used to them.

Drop Down Box : A drop down box is an element in which there will be more than one option. In those many available options we have to choose one option. When you click on that element, a list will drop down. Hence the name.

Radio Buttons: A radio Button is a set of buttons similar to drop down box where we can choose only one option. Many years ago when radios were newly used, radios had a group of buttons out of which you can only press one button at a time. When you press the second button, the first button which is already pressed will come up and this second button will pressed down. Here also radio buttons will work in the same way. You can only click one button at a time.

See in the image. For enabling internet banking there are two radio buttons Yes and No. You have to choose either Yes or No. You cannot choose both at a time.
Radio buttons are used when you have to choose only one option from given options.
You may be thinking drop down boxes are also used for the same purpose. Then when should use radio button or when should we use drop down boxes.
Radio buttons are used when the there only 2 or 3 options. Imagine there are 100 options. It will be very confusing when 100 buttons are present on the screen. In such cases drop down boxes are used. When more options are there we use drop down boxes.

Check Boxes:  A check box is an element which is used when you can choose more than one option. But in finacle they never used more than one check box at time. A check box is nothing but a small box , when you click it, a small tick mark will come. It is used to indicate Yes or No in our Finacle. When you check it , it means Yes, when you uncheck it, it means No.
         
Buttons:  I hope everybody know what a button is. In the image, we have two buttons. 1) Submit 2) Cancel.
We have seen a lot of buttons in Sanchay Post. Some of them are
·        New Form
·        Send
·        Yes
·        NO
·        Ok etc.
In finacle we see different kinds of buttons. I will explain some of them

v Go: When you click on Go button, Finacle will show you the next screen of the transaction which you are currently doing.
v Post/Submit: When you click on Post button or Submit , it means that your transaction is completed.
v Validate: This button can be used to check whether you have correctly filled all the fields on the screen. When you click Validate button, Finacle will check whether everything is right. If something is missing it will show you some error.
v Clear : Clear button can be used to delete all the data which you have entered in a screen and a fresh form will appear on the screen
v Cancel: As we all know by clicking cancel, the current incomplete transaction will be cancelled and a new screen will appear
v Back: Back button will take us to the previous screen of the transaction which you are currently doing.

So this is the basic terminology which is used in Finacle. Don’t worry if you think I have missed something, that something will be covered as and when necessary.

Also please keep in mind, that if I’m not teaching about anything in Finacle, it means that it is not necessary to learn. Your counter transactions will still run without any problem and you can still close the counter by 04:30pm.

See you in the next lesson.

Points to Remember:
    1.     Apart from Function, finacle needs some more information to complete our transaction.
    2.     Finacle terminology is different from our general terminology. But since finacle   terminology is on par with global banking terminology let’s get used to it.
    3.     SB, RD, TD, MIS etc are called as Products.
    4.     Learn all the elements which I have discussed in this lesson.